BP Battle Report: Elixheim Turn 1 British and the Amusing Blunder of the 1st Brigade
I hope you read the battle report for Field of Battle. It's the first one I tried. Videoing is not one of my best talents so I'll give a written one with photos for you.
The scenario I worked on is from Black Powder, Page 118, The Battle of Elixheim. It took me a year to purchase and paint all the miniatures in 6mm for the scenario. I made the battlefield on an 8' x 4' board in the garage. However, I'm using 6' x 4' as the original battlefield was 12' x 8' (more space than I can have I'm sorry to say. Perhaps when I buy a new home I'll invest in a game room with adequate space for large, 28 mm figures).
Always Start with Prayer
Wargamers Prayer: Dear Lord, You give us games that allow us to enjoy each other's company, share in fellowship, experience joy in play, learn from our past and memorialize those who came before us for the sacrifices they made. May you be with us in our games and learn about You as we play. Let's be ferocious opponents on the "battlefield" but even better friends in life. In Your Son Jesus name I pray. Amen.
Overview
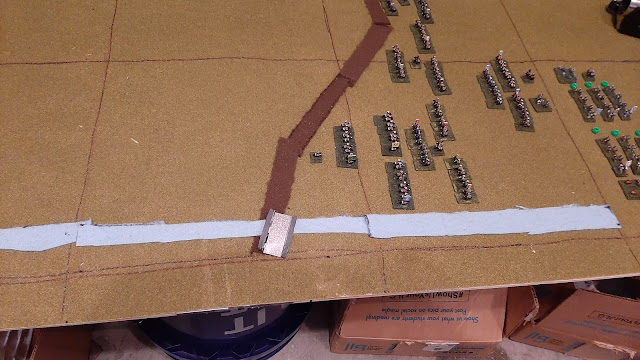
Here is the battlefield from a wholistic view


Along the road are the British and Dutch infantry in March columns.

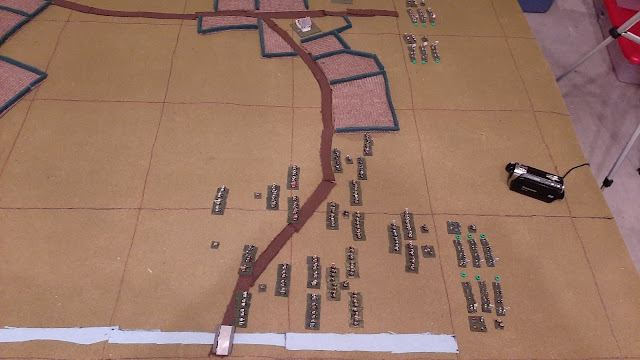
Here is a look at those 4 infantry brigades again from the North facing South.

Here are the unit stats for the 1st - 4th Brigades. Note I rolled for a single leader to have a leader trait and the lucky general was Van Halen of the 4th Brigade. He is aggressive.


Chart notes:
ID # = Identifier #: Each unit has a number under its bases that identifies it.
Unit: historical unit names for the painted regiments. Note, these units are from the Battle of Blenheim and more than likely not at the battle of Elixheim. Still, they work for the scenario. I can always change them later if I find the actual order of battles (I found one for the French after the fact but not for the British). Some leaders I could not find a historical general or there were duplicate names for both regiment and brigade commanders. I made up fictious names in those cases. These commanders are Van Halen, Von Schnitz, Brauf, Beauchamp, and Keller.
Arms = unit weapondry
M & B = Musket and Bayonet
Type = unit class and if infantry, cavalry or artillery.
RI = regular infantry
Art = artillery, in this case, all guns are battalion guns.
H-to-H = hand to hand combat dice
Sht = shooting dice
M = morale rating
Stm = stamina rating
The British and Dutch cavalry


The French and Bavarian cavalry brigades. Infantry is off board until the 2nd move.

The French also have a general with an attribute. Theirs is General Merode-Westerloo of the 7th Brigade. He is hesitant. D'Alegre will have to stay close to him.


The Pre-Game Initiative Roll

Turn 1 British and Dutch
Orders
6th British Cavalry Brigade under General Palmes
"The 6th Brigade, All regiments! Advance as a brigade, forward!"
Staff Rating = 8 - Roll 2 = 6 for 3 moves
Starting Positions: Yellow flag = Cavendish Regt, Blue Flag = the Queen Dowager's Regt, Green Flag = The 2nd Plymouth Regt.

The Advance

In the face of the enemy, just short of contact

7th British Cavalry Brigade under General Wood
"All Regiments. Advance as Brigade. Forward!"
Staff Rating = 8 - Roll 2 = 6 for 3 moves
Starting Position: Top: Shrewsbury Regt, Bottom: The Queen's Regt, Rear: 1st Plymouth Regt

The Advance

Advance almost to contact


5th Dutch Cavalry Brigade Under General Nassau
"All regiments! Follow the 6th and 7th Brigades. Form 3 lines to lend support from behind. March!
Staff Rating 8 - Roll 3 = 5 for 3 moves
Starting Position: Top are Oranje-Friesland Regt. Bottom are Wurttemburg Regt. Rear are Ginkle Regt.

Their advance

Final positions

Zoom Out

4th Dutch Infantry Brigade under General Van Halen
"March in columns by regiments towards the bridge to Tirlemont then follow the road South."
Staff Rating 8 + 2 for being in march column along a road = 10 - Roll 6 = 4 for 3 moves.
Van Goor Battalion
"Advance and follow behind Salisch"
Staff Rating 8 + 2 for being in march column along a road = 10 - Roll 7 = 3 for 3 moves.
Pallandt Battalion
"Advance and follow behind Van Goor"
Staff Rating 8 + 2 for being in march column along a road = 10 - Roll 5 = 5 for 3 moves.
Battalion Artillery
"Advance and follow behind Pallandt"
Staff Rating 8 + 2 for being limbered along a road = 10 - Roll 5 = 5 for 3 moves.
Note about artillery. My units are based according to Field of Battle rules. They are consistent to be played with Black Powder. A difference is that FOB artillery batteries are represented by 2 gun models instead of 1 that is used in BP. You can put one piece behind the other to show that the battery is limbered. I like that! Here is the battery shown here.

Before Moves:


3rd British Infantry Brigade Under General Webb
"Follow the 4th Brigade"
Staff Rating 8 + 2 for being in march column & limbered along a road = 10 - Roll 6 = 5 for 3 moves.
Their position after move.

2nd British Infantry Brigade under General Ferguson
"Follow the 3rd Brigade"
Staff Rating 8 + 2 for being in march column & limbered along a road = 10 - Roll 6 = 5 for 3 moves.
Their position ends here

1st British Infantry Brigade under General Rowe
"All battalions right face to form line and advance past those houses. Guns stay limbered and advance with the Welch Fusilers."
However...General Rowe was snacking a nice loaf of bread and honey. He had a very sticky mouth that could not enunciated his command articulately. Furthermore his food was also attracting gnats that annoyed him. Thus his hand gestures made it look as though he was ordering the columns to get off the road to and march over the hill behind them.
The poor chaps not understanding their commander's orders marched their columns left and took to the hills leaving the battlefield. Only the limbered artillery remained.
Rowe threw his hat on the ground and tried to shout but with a mouth full of honey he could only mumble inarticulate curses.
The Duke of Marlborough was nearby and witnessed the whole thing. However, he had chosen not to attach himself to any brigadier generals as he probably should of thus not being able to counter-order Rowe's command.
Staff Rating 8 - Roll 12 BLUNDER!!! The blunder roll is a 1 so the units must march 2 moves towards their end of the board away from the enemy that they can see in the distance.
Starting Position: Notice that Commander John Churchill is nearby and could of rerolled the failing roll had he only attached himself to Rowe at the beginning of the turn. Learning a lesson in the school of hard knocks.

Ending Position: Note all 3 regiments have left the field in march column. The artillery is also trying to flee but doesn't have the movement to do so.
End of Turn Review
The confused 1st Brigade. Note that General Churchill moves into contact with Rowe for next turn.

The Infantry along the sunken road.

The cavalry ready to engage!


Comments
Post a Comment
Please feel free to comment. However, I do moderate all comments to keep the blog a "family friendly" site so no profanity.